Sunday, 30 October 2016

HONG RC Cessna Unboxing and review


Hong RC Cessna
Weight : not available
Motor 2212 1400kv
Esc 30amp
Battery 2200mah 3 cell


Review
I recently by this Cessna because its big, cheap and a scale look..

and most of all, it had everything to start fly, except electronic
its fly so smooth, and quite heavy for a epo scale plane


every thing is ready, linkage, rod, landing gear etc:

the only problem i see is spar is so long, that the seller had to put a hole in a box for spar placing 


a fully assemble cessna airplane


comparison with "branded one" 

Tuesday, 12 May 2015

Tuesday, 17 March 2015

IB Crazy Antenna Selection

First i though when buy antenna ...the higher gain is the best antenna , seems i am wrong

read articles FPV guide from IBcrazy RCGroups


FPV antenna selection – A guide to help you select the best antenna system for you.

Antennas are the critical link between a transmitter and receiver, so it is best to select the proper antennas for your FPV scenario for the best possible flight experience.  If you refer to the “How to be successful in FPV” guide, you will note that one of the big points is that there is no such thing as best.  There is however, the one that works best for me.  This guide will help you find that system.

Polarization – Circular or linear?
Recently a few FPVer’s including myself have discovered the merits of circular polarization.  Circular polarization is not for everyone, but does give the most consistent performance.  Linear is more common, much simpler and is technically capable of longer range.  So which do you choose and why?

Circular polarization:
Circular polarization is used by NASA and many HAMs to communicate with satellites that orbit the Earth as the orientation of the satellite is consistently changing.  Circular polarization has two distinct advantages:  it rejects multipath interference (which is the most common reason for video issues), and does not lose polarization when a plane banks to turn.  If you are having trouble with video scrambling or random drop outs, this is likely due to multipath interference.  MULTIPATHING IS NOT FUZZ IN THE VIDEO!  MUTIPATHING IS SCRAMBLING OR SUDDEN DROP OUTS!

When to use circular polarization:
- When where your base station is near (within 100 feet) of large structures such as houses or buildings
- When standing on a porch or deck of a house or apartment or other building
- When stunt flying
- When flying behind trees and objects
- When doing low altitude flying
- When flying very high altitude (with a directional antenna)
Linear polarization:
Linear polarization is very common and is the easiest to implement.  It is capable of longer range than circular polarization, but is more susceptible to multipathing.  The range advantage is seldom realized due to multipath interference.   The antennas tend to be more compact and easier to build (as well as cheaper to buy).

When to use linear polarization:
-          When flying out in the open with no structures nearby
-          When flying planes that do not bank sharply
-          When going for long distance runs
-          When standing on top of a hill or mountain
-          Where antenna compactness is needed

What if my flight goals encompass several merits of each type of polarization?  This is often the case with most FPVers.  You can’t have it all so you must make an educated guess.  If you are a current FPVer and are having problems with video drop outs and scrambling, then circular polarization will help you.  If your problem is that you are getting fuzz in the video due to going very long range, use linear polarization.


RX antenna selection – How much gain do I want?
Now it’s time to determine how much directivity (gain) is best for you.  This will be determined by your flight area and where you wish for your plane to go.  As the gain of your antenna increases, so does the available range of the video system.  Unfortunately, higher gain antennas have narrower beams and thus are not suitable for short range missions.
Omni directional antennas provide great coverage when flying near the base station, but do not do well for long range missions.  Similarly, a high gain grid or dish antenna would make a poor choice for flying around a park.  Most FPVer’s will find that a moderate gain antenna suits most of their needs. 

Use omni directional antennas when:
-          You plan to fly all around yourself
-          When flying short range (2km or less)
-          When standing in the middle of the flight field
-          When you want a quick and easy set up

Use moderate gain (5-9 dbi) antennas when:
-          You plan to fly moderate range (2-8km)
-          You want to fly an area out in front of you
-          You desire more range than an omni, but want to be able to fly patterns and stunts
-          When using an antenna tracker

Use high gain (10+ dbi) antennas when:
-          Exploring an object or destination very far away
-          When flying in a straight line and coming straight back
-          When making long distance attempts
Examples of Omni antennas:
-          ½ wave dipole (common rubber ducky type antenna)
-          The Vee antenna
-          Cloverleaf antenna
-          Skew-planar wheel antenna
-          The ground plane antenna
Examples of moderate gain antennas
-          3 or 4 element Yagi
-          8dbi patch
-          3 turn helical
-          8dbi circularly polarized patch
-          Moxon Rectangle
Examples of High gain antennas
-          Multi element Yagis
-          Grid or dish antennas
-          BiQuad or double BiQuad
-          Patch antenna arrays
-          14 dbi patch antenna


TX antenna selection:  What do I fly on the plane?
While there is much discussion on which antenna should be used on the ground, the aerial antenna is less discussed because there are fewer choices, but it is no less important.  Generally speaking, lower gain antennas are better for airplanes, but helicopters and long distance runs might opt for higher gain omni antennas.

Since the choices are few, I will discuss each type:
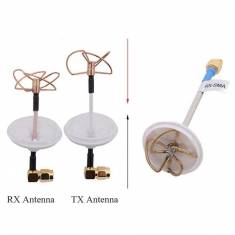
The ½ wave dipole – This is the antenna to which all others are compared. With a moderate 2.15 dbi gain, the antenna has a large null over the top and bottom of the antenna.  This is best used for long range attempts.
The Vee antenna -  This antenna has slightly less gain (~1.9 dbi) than the dipole and is best suited for general purpose flying.   This antenna was introduced to the FPV realm in 2009 and has been used very successfully by many FPVers.
Skew-Planar Wheel – Relatively low gain (.92dbic) this antenna is circularly polarized and has excellent multipath rejection capability.  This antenna is used for general purpose flying where aerodynamic drag is not a critical factor.  This antenna was introduced in 2010 by Nigel (devonboy) which opened up the doors to CP on the airplane.
The Cloverleaf – With moderate gain (1.25 dbic) this antenna is slightly longer range than the Skew planar wheel antenna, but has a slightly oblong horizontal pattern.  This antenna is great for general purpose flying and moderate range where less aerodynamic drag is required.  This is the newest aerial antenna to the FPV world.  Designed by Alex (IBCrazy) as an easier to build higher gain substitute for the Skew-planar wheel.


 Choosing the proper RX antenna:
Here I will some of the common antennas we use for FPV and de-bunk some myths as well.  The omni directional antennas listed above all work for RX applications as well and therefore will not be discussed here.

Linear patch antenna – This antenna is by far the most common directional FPV antenna.  With compact size and a 70 degree beam width this allows a good sweep of coverage right out in front of you. This antenna is ground plane dependent, however, and performs best when mounted just a few inches off of the ground.  Frequencies above 2GHz may find that this antenna can be mounted high in the air with minimal problems. 
The low mounting requirement is the antenna’s greatest downfall.  It makes flying in hilly areas difficult as the Fresnel zone is easily disrupted.

Yagi antenna – A much less commonly flown antenna than the patch, this antenna is found in a wide range of gain values.  The beam on this antenna is fairly narrow but it is easy to aim and can be mounted up on a tripod or stand as it is not ground plane dependent.   It is a good choice for an antenna tracker provided the tracker is strong enough to take the weight of the antenna.
The greatest downfall with the Yagi is moisture.  Moisture causes degradation of antenna performance as more elements are added.

BiQuad antenna – The BiQuad is a very efficient 11dbi antenna.  Perhaps even less common than the Yagi, this antenna shares the compact size of the patch without the dependence on a ground plane.  The antenna has small side lobes which help in landing.  This antenna works well with antenna trackers.
The greatest downfalls of this antenna are that it is hard to find (it must be built as it isn’t commercially available) and it is fragile.

Grid antenna – Commonly used for long range, this antenna is highly directive.  Gains can range from 15-24dbi.  This antenna is not ground plane dependent and is best mounted high in the air.
The greatest downfall of a grid antenna is efficiency.  Grids are seldom more than 60% efficient.  So while your range capability is great, you must fly in a very narrow beam.

Helical antenna – This antenna is circularly polarized with exceptional axial ratio and multipath rejection.  It is extremely broadband and can be made for a wide range of gains.  Smaller units can be mounted to an antenna tracker.
The greatest problems with the helical is that the efficiency is often not exceptional (between 60 and 80%) and that they are not readily available commercially. 

CP Patch – Similar to the linear patch, but circularly polarized.  This antenna is compact and easy to use.
The problems with this antenna are its low axial ratio (multipath rejection capability), and that it is ground plane dependant.

CP BiQuad – The CP BiQuad is an 8dbi circularly polarized antenna.  It has a compact size that is suitable for antenna trackers and is not ground plane dependent.  Alex (IBCrazy) is currently developing this antenna.
The greatest downfall of this antenna is that it has not been perfected yet and therefore will not be available for some time. 


More information:
More information can be found by watching Andology’s video:  http://www.vimeo.com/8826952

Or by visiting IBCrazy’s blog:  http://www.rcgroups.com/forums/member.php?u=103113

Monday, 9 February 2015

Arduino Nano DIY Headtracker test run


Using Arduino Nano and GY-85 sensor
with Fatshark Base SD and Mobuis Headtracker

more info on RCGroups on how to build one
http://www.rcgroups.com/forums/showth...

and here are the parts needed to buy and build it.

Arduino Nano Clone
http://www.banggood.com/ATmega328P-Na...

GY 85 sensor
http://www.banggood.com/GY-85-BMP085-...

Monday, 17 November 2014

DIY Mini Speedster Depron Plane from Flitetest

mini speedster, depron, fpv
Above is my new mini speedster plane that i build from depron, it use only 2 cell battery and have nice flying characteristic, very floaty and easy to build

Project Status : Success
Project Time-frame: Mid November 2014
     
mini speedster


          Picture from flite test website

 The other three motor has being used as a mini DIY tricopter, for the maiden flight it was a successul and fly nice ..


Video:
below is my maiden flight video with attached mobius cam with my hat
Picture :

I added few changes like a landing gear, fuselage cover and a LEGO action figure toy to added scale look
here are the photo below


maybe when budget permits i will added mini FPV setup for a pilot's view


http://www.thingiverse.com/thing:327338#sthash.zTzt6Zho.dpuf
Project Summary

This is first plane i ever made from flite test plans, it only use 1/2 depron to build one and the instruction to build is very easy and if you lost, just follow the guide video from Josh from youtube.

from the video you can see the motor seems lack of thrust, i cannot able to make a loop with this motor, soon i will upgrade to a better motor

Spec
one only ZMR@RCX motor 1804 from Myrcmart
-Afro ESC 12 amp simonk
-Turnigy 9xr and 800mah 2 cell
- 5x3 props

when the budget permits i will upgrade it with smallest camera and fpv equipment, i dream to fly it

Project Budget
RM 30.00 and a old mini quad

Parts for the Project

1. ZMR Motor -


http://www.banggood.com/ZMR-1804-2400KV-Micro-Size-Integration-Outrunner-Brushless-Motor-p-923424.html?p=6Q272106433620120652


Source from:
 http://www.flitetest.com/articles/ft-mini-speedster-build

Sunday, 16 November 2014

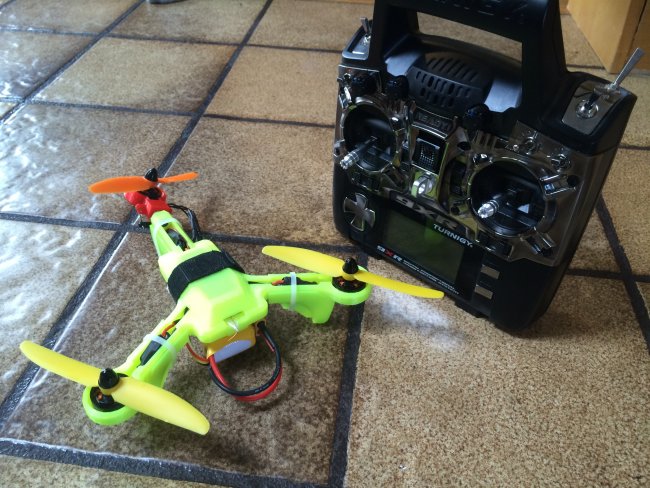
DIY 3D Printed Tricopter with Acro Naze32

Project Summary: To make a fun mini tricopter that can fly indoor and outdoor
Project Status : Success
Project Time-frame: Mid November 2014


Pic above from flite test :http://www.flitetest.com/articles/mini-tricptr-3d-printed-tricopter

Video:
below is my maiden flight video with attached mobius cam with my hat


http://www.thingiverse.com/thing:327338#sthash.zTzt6Zho.dpuf
Project Summary

one of the motor from my previous miniquad is being use as powerpod for flitetest mini speedster plane,
The remaining 3 motor is used for my 3d printed tricopter...
This is my first tricopter build and it is also my first maiden of my tricopter

Spec
-3 ZMR@RCX motor 1804 from Myrcmart
-Afro ESC 12 amp simonk
-Acro Naze32
-1300 mah 3cell with 5x3 props

 The most crucial parts of tricopter is how to build a tilt mechanism, it must had a good servo speed and agility .
For maiden flight the first problem that i facing is the quad start spinning one direction only.
the problem is solved after i reverse the servo setting at a Baseflight configurator.

The mini tricopter is fly so fast and agile..but it is a small size and hard to find the orientation once the tricopter flew away. so for my next project is to put FPV equipment for long range flight with this mini

Project Budget
RM 30.00 and a old mini quad

Source from:
http://www.flitetest.com/articles/mini-tricptr-3d-printed-tricopter
http://www.thingiverse.com/thing:327338#sthash.zTzt6Zho.dpuf
http://www.thingiverse.com/thing:327338

Sunday, 13 April 2014

DIY Mini quad with Acro Naze32 FC

After sometimes flying 450 size quadcopter i really satisfied with its performance, no jello and working perfect with APM flight controller.

I am realizing 450 size its heavy and quite bulky, its put much space with sharp and large prop,

I need a quadcopter that same performance like 450 but light and portable.,,,,,

yess the answer is mini quadcopter 250 size..

seems to me that if quadcopter with smaller size the price of component is lower ..wrong man, the price still same for frame and motor, a Blackout carbon fiber frame price is nearly one DIY 450 quad price

i bump to a blog named http://untestedprototype.com/ . Its about how to build a mini quadcopter with plans included. i called my friend who had CNC machine to build it.


My friend make it with including damper for eliminating vibration and jello free. the material is from G10, quite rigit but heavy abit compare to carbon fibre frame, the weight frame only is about 180gram

For power setup, i get a quite nice review from my friend that using ZMR/RDX 2400kv motor and 10amp Simonk ESC from Myrcmart..so i brought it for RM 279 complete 4 motor and 4 esc

Now for Flight controlled, i choose Acro Naze32 because it had a good review and same performance like openpilot CC4, when the FC arrived ..i could not believe its so small and light but powerful,
to use Acro Naze32 and configurate it is not so hassle because it only had autolevel function. The program i used is Baseflight configurator that u can find it at google crome apps.


For props i just use cheap gemfan 5x3, its price half the price standard 10x4 multirotor prop

My maiden flight is smooth although my 1000mah battery shows it has no punch, i need to get a new battery

My FPV experience with mini quadcopter is quite surprising , it so much nice to control and handle .
.here my video show for my first time fpv with mini's

Wednesday, 19 February 2014

How to build an Multirotor with APM Arduflyer Flight Controller part Two

continue from part 1...

After assembly all the parts, now join the motor to quadcopter arm using screw that provided with
, make sure u put a little bit treadlock oil for grip, not to much, believe me its so hard to unscrew it

finally all four motor now inserted to each arm, next is to put esc


Tuesday, 18 February 2014

How to build an Multirotor with APM Arduflyer Flight Controller part One

After so many times ups and down with my quadcopter, now is time to upgrade my motor.  The reason i wanna upgrade is that my left side motor seems has lost its c-clip and it cause the motor not to spin smoothly or maybe the bearing is broken... so i decided to build again my quad copter from scratch and share to fellow readers how to build an Multirotor and to Setup APM arducopter with Mission Planner

First of all to start build it, we have to list out the component need to make a functional quadcopter

here the picture and a parts need to build it, some of the parts are  from my old quad copter, feel free to change with your preferred setup, this setup is just for guidelines only

  Here my quad setup specification

a. 4 unit sunnysky 980kv motor
    - this is good motor and balance well from what i heard from internet, still in the box not tested yet

 or u can use this motor like Turnigy Multistar
 http://www.hobbyking.com/hobbyking/store/uh_viewitem.asp?idproduct=49866&aff=447355


b. 4 esc Hobbyking 20a with Simonk Firmware

click link down below for info

c. a power distribution board

click link down below for info 
 d. For flight controller i use APM 2.52 or at Hobbyking as a HK Pilot Mega V2.5 

for info and price click link below
e. still the board doesn't quite completed with GPS for function like loiter and Return To Home
http://www.hobbyking.com/hobbyking/store/uh_viewitem.asp?idproduct=49725&aff=447355

additional parts like

g. prop CW and CCW (clockwise and Counter Clock Wise) 10x4.5 size
h. 3.5mm gold connector for esc
i. some doublesided tape, hex screw


Wednesday, 5 February 2014

Turnigy basic FPV googles review

Tunigy basic FPV google  is an inexpensive and easy to use for anyone who wanna try FPV but lacked budget.  I received one unit of used google  through online purchase at Malaysia RC forums with cheap price and it has been modified and inserted with ski google to block light and to feels total darkness. 

The unit I received included  with pouch , cleaning cloth and 2 earphones ,The google  has a connection to the casing that has switch device on / off and contained batteries with it , it is also a place to connect a 3.5 audio jack to hear sound .the google had a long wire with RCA plug to connect any device that support it 

I test the connection from my googles to Astro Setelite box to see the picture and screen quality, The images was clear and u can see tv lines in it, what can i say it only has 320 resolution 


..it feels like viewing a regular 32inch TV  in a dark room with a distance 2 meter..although the resolution is low, the colour and virtual screen size is small, its still usable for FPV flying 


To use it for FPV flying u still need others device like Video Transmitter, Video Receiver and decent camera with wide lenses ..here the list of it to starting an a basic FPV equipment


boscam TX and RX


click Hobbyking link for info
http://www.hobbyking.com/hobbyking/store/uh_viewitem.asp?idproduct=15295&aff=447355

and for camera 

http://www.hobbyking.com/hobbyking/store/uh_viewitem.asp?idproduct=16461&aff=447355


and i put my FPV equipment at my MJX F45 helicopter. i was my first time FPV flying...its quite funny and a whole new experience, i had an difficulty to navigate because my camera lenses is not wide enough to see the surrounding

 
 My first FPV helicopter....its a thrill


another lack of this google..it has long wire and sometime i get tangle with it, so to setup FPV it consumes time...i recently mod it like this


                                                     the fan is nothing to do with google ...


anyway still it is best google around for new comers ...but the google is hard to find at hobbyking now


Pro -
1.Cheap 
2.Easy to Use
3.long battery usege
 
Cons  

Low Resolution  
Sense of bulky especially wire from google
Small FOV
Related Posts Plugin for WordPress, Blogger...

Popular Posts