is about my first try to fly the MJX F45 brushless setup at Dato Onn field , test her performance on wide open space..

Showing posts with label About GPS. Show all posts
Showing posts with label About GPS. Show all posts
Tuesday, 16 July 2013
MJX F45 brushless at Dato Onn Flying Field
May i present for my youtube video section
is about my first try to fly the MJX F45 brushless setup at Dato Onn field , test her performance on wide open space..
is about my first try to fly the MJX F45 brushless setup at Dato Onn field , test her performance on wide open space..
Thursday, 4 July 2013
FPV MJX F45 for the First Time
Finally i manage to build and make a simple FPV. which i will release a simple review and tutorial how to connect and powered 5.8ghz Video ...

Right now after i attach simple keychain camera, i wish i had a live feed view from my MJX F45 helicopter so i buy a cheap 200mwatt video transmitter and receiver from my friend ..the question is can my MJXF45 can carried my camera?
After several searching for information how many weights do MJXF45 can carried . i read a forum post says that it can carry gopro camera weight about 100grams, so i buy a very light 3cell lipo 360mah ..and put all electronic including camera and battery...guesst what ? it weight same as GoPro Camera about 100gram also
Now i build casing for my VTx( Video Transmitter) put it at a below my helicopter and patch it fiber tape..and fly it first to see if my copter can carried it ..after all my heli is now brushless n lots of power.
After a while hover my heli with camera it seems no problem.
So i decided to bring my FPV equipment such as google, video receiver and FPV helicopter to field beside my house ...this is my first time to fly FPV style ...seems very odd but feels gread ..i manage to hover it but seems quite difficult fly with limited view..i will try to fly it again soon
Monday, 27 May 2013
My MJX F45 brushless conversion build
Finally after several weeks and days reading from RC Groups forum, i finally decided to convert my main motor to brushless one, i know its only fixed pitch helicopter but i just wanna mod and try something
In RC Groups forum the suitable motor to convert brushless is EH 200 and for pinion is 10 teeth
this is the pic of the motor and link from hobbyking ]
 http://www.hobbyking.com/hobbyking/store/uh_viewitem.asp?idproduct=11881&aff=447355
 For list of other parts
Hex screw
http://www.hobbyking.com/hobbyking/store/uh_viewitem.asp?idproduct=14202&aff=447355
Pinion 10 teeth
http://www.hobbyking.com/hobbyking/store/uh_viewitem.asp?idproduct=11198&aff=447355
ESC 18Amp
http://www.hobbyking.com/hobbyking/store/uh_viewitem.asp?idproduct=4312&aff=447355
for connection, just put the ESC servo connector to extra slot infront aileron n elevator servo slot in MJX F45 pcb board and for powered the esc, solder positive n negative esc to PCB board +/-wire

after done assemble, carefully reroute wire connection so it can fit canopy
 now for hover test
http://www.youtube.com/watch?v=hMa6biX5Lag
and for outdoor test
http://www.youtube.com/watch?v=hMa6biX5Lag
In RC Groups forum the suitable motor to convert brushless is EH 200 and for pinion is 10 teeth
this is the pic of the motor and link from hobbyking ]
Hex screw
http://www.hobbyking.com/hobbyking/store/uh_viewitem.asp?idproduct=14202&aff=447355
Pinion 10 teeth
http://www.hobbyking.com/hobbyking/store/uh_viewitem.asp?idproduct=11198&aff=447355
ESC 18Amp
http://www.hobbyking.com/hobbyking/store/uh_viewitem.asp?idproduct=4312&aff=447355
for connection, just put the ESC servo connector to extra slot infront aileron n elevator servo slot in MJX F45 pcb board and for powered the esc, solder positive n negative esc to PCB board +/-wire
after done assemble, carefully reroute wire connection so it can fit canopy
http://www.youtube.com/watch?v=hMa6biX5Lag
and for outdoor test
http://www.youtube.com/watch?v=hMa6biX5Lag
Tuesday, 14 May 2013
How our GPS coordinate is determined
What is Trilateration?
The measurement of a series of distances between points on the surface of the earth, for the purpose of establishing relative positions of the points in surveying.
Trilateration is a method for determining the intersections of three sphere surfaces given the centers and radii of the three spheres. huerm....... my gps device so brilliant... math-power.....
See this diagram.....

We start with the equations for the three spheres


and

We need to find a point located at (x, y, z) that satisfies all three equations.
First we subtract the second equation from the first and solve for x:

Substituting this back into the formula for the first sphere produces the formula for a circle, the solution to the intersection of the first two spheres:

Substituting : into the formula for the third sphere and solving for y there results:

Now that we have the x- and y-coordinates of the solution point, we can simply rearrange the formula for the first sphere to find the z-coordinate:

All this calculation has been made and use by our GPS to do tracking
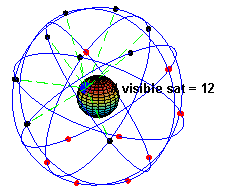
Diagram credit: Wikipedia
_________________
Source taken from :
FauSham @ Malaysia & Singapore Free Maps - MalFreeMaps
AMATEUR RADIO CALLSIGN: 9W2WFN
The measurement of a series of distances between points on the surface of the earth, for the purpose of establishing relative positions of the points in surveying.
Trilateration is a method for determining the intersections of three sphere surfaces given the centers and radii of the three spheres.
huerm....... my gps device so brilliant... math-power.....See this diagram.....
We start with the equations for the three spheres
and
We need to find a point located at (x, y, z) that satisfies all three equations.
First we subtract the second equation from the first and solve for x:
Substituting this back into the formula for the first sphere produces the formula for a circle, the solution to the intersection of the first two spheres:
Substituting :
into the formula for the third sphere and solving for y there results:Now that we have the x- and y-coordinates of the solution point, we can simply rearrange the formula for the first sphere to find the z-coordinate:
All this calculation has been made and use by our GPS to do tracking
Diagram credit: Wikipedia
_________________
Source taken from :
FauSham @ Malaysia & Singapore Free Maps - MalFreeMaps
AMATEUR RADIO CALLSIGN: 9W2WFN
How to calibrate Garmin GPS Screen
The calibration procedures below are what I have so far gathered.
For Nuvi 2xx series:
1. Have the unit turned OFF and unplugged from power.
2. Slide the power switch to the ON position and hold for about 45 seconds.
3. A message will display on the screen: Press Dot.
4. Once this message displays, release the Power button.
5. Press in the center of the Dot.
6. Keep pressing in the center of the Dot as it moves around the screen.
7. Once this is complete, there will be a message: Calibration Complete.
8. Touch Ok and the unit will restart.
9. The touchscreen will now be recalibrated.
For Nuvi 5xx Series:
1. Power off device.
2. Press and hold the top-left corner of touch screen
3. Power on Device.
4. Continue to hold finger on screen for about 30 seconds, a small dot will appear.
5. Release the screen and touch each dot in the position as it appears on the sceen.
6. Touch "OK" when you see the "Calibration Complete" pop up.
For Nuvi 27xx/28xx/7xxx Series:
1. Touching Settings from the Main Menu
2. Touching Screen
3. Touching Calibrate Touch Screen
4. Touch the Screen
5. Touch the Dot on the screen and follow the dots as they move
For Nuvi 300 or 600 series:
1. Power the unit On.
2. From the Where to? and View map screen, touch Settings (wrench icon).
3. Touch Display.
4. Touch Recalibrate.
5. A new screen will display that says Press Dot.
6. Touch the Center of the Dot.
7. Keep touching the center of the dot as it moves around the screen.
8. When Calibration Complete appears on the screen, please touch OK.
For Nuvi 7xx series:
1. Start with the unit powered OFF and unplugged from power supply.
2. Press and hold your finger anywhere on the touch screen
3. Next, slide the power switch ON and immediately slide it into the Lock position. There is no need to wait for the screen to flash on or show the Garmin logo before moving the switch into the Lock position.
4. Leave your finger on the screen for about 45 seconds.
5. Two intersecting lines should display on the screen along with the message: Press Dot.
For Nuvi 5000 Series:
1. Start with the unit OFF while plugged into power.
2. Press and hold your finger anywhere on the touch screen.
3. Power the unit ON and continue holding your finger on the touch screen.
4. Leave your finger on the screen until Press dot appears.
5. After Press dot appears, take your finger off the screen.
6. Touch the center of the dot.
7. Continue touching the center of the dot as it moves around the screen.
8. After all the dots have been pressed, Calibration Complete will appear on the screen.
9. Touch OK and the unit will restart.
For Nuvifone G60:
1. Turn off the Nuvifone
2. Hold device so the power button is on top (portrait orientation).
3. Press and hold the power button until the calibration screen appears(about 60 seconds).
4. Release the power button
5. Follow the directions to calibrate the screen
For Nuvi 1xxx Series:
1. Make sure the Device is turned off
2. Press and hold the top left corner of the touchscreen
3. Power the unit on whilst keeping hold of the top left corner
4. Continue holding the top left of the screen, after 30 seconds, a small dot will appear
5. Release the touchscreen and accurately touch the dots in turn as and when they appear
6. Once complete a message will appear, ‘Calibration Complete’, Touch OK
The screen will now be calibrated.
For Oregon series, here are the steps to calibrate the touch screen:
1. Turn the Oregon off and power it back on again, holding the power button down as it initializes.
2. After about 30 seconds you will enter a screen calibration page where you can recalibrate the touch screen.
For Papago R58xx series:
1. Tap "Advance Settings"
2. Scroll down to the "System" tab at the bottom
3. Tap "Calibration"
Last modified on: 10/02/2009
Source: Garmin FAQ
Monday, 4 March 2013
How to calibrate your GPS Screen
For Nuvi 2xx series:
1. Have the unit turned OFF and unplugged from power.
2. Slide the power switch to the ON position and hold for about 45 seconds.
3. A message will display on the screen: Press Dot.
4. Once this message displays, release the Power button.
5. Press in the center of the Dot.
6. Keep pressing in the center of the Dot as it moves around the screen.
7. Once this is complete, there will be a message: Calibration Complete.
8. Touch Ok and the unit will restart.
9. The touchscreen will now be recalibrated.
For Nuvi 5xx Series:
1. Power off device.
2. Press and hold the top-left corner of touch screen
3. Power on Device.
4. Continue to hold finger on screen for about 30 seconds, a small dot will appear.
5. Release the screen and touch each dot in the position as it appears on the sceen.
6. Touch "OK" when you see the "Calibration Complete" pop up.
For Nuvi 27xx/28xx/7xxx Series:
1. Touching Settings from the Main Menu
2. Touching Screen
3. Touching Calibrate Touch Screen
4. Touch the Screen
5. Touch the Dot on the screen and follow the dots as they move
For Nuvi 300 or 600 series:
1. Power the unit On.
2. From the Where to? and View map screen, touch Settings (wrench icon).
3. Touch Display.
4. Touch Recalibrate.
5. A new screen will display that says Press Dot.
6. Touch the Center of the Dot.
7. Keep touching the center of the dot as it moves around the screen.
8. When Calibration Complete appears on the screen, please touch OK.
For Nuvi 7xx series:
1. Start with the unit powered OFF and unplugged from power supply.
2. Press and hold your finger anywhere on the touch screen
3. Next, slide the power switch ON and immediately slide it into the Lock position. There is no need to wait for the screen to flash on or show the Garmin logo before moving the switch into the Lock position.
4. Leave your finger on the screen for about 45 seconds.
5. Two intersecting lines should display on the screen along with the message: Press Dot.
For Nuvi 5000 Series:
1. Start with the unit OFF while plugged into power.
2. Press and hold your finger anywhere on the touch screen.
3. Power the unit ON and continue holding your finger on the touch screen.
4. Leave your finger on the screen until Press dot appears.
5. After Press dot appears, take your finger off the screen.
6. Touch the center of the dot.
7. Continue touching the center of the dot as it moves around the screen.
8. After all the dots have been pressed, Calibration Complete will appear on the screen.
9. Touch OK and the unit will restart.
For Nuvifone G60:
1. Turn off the Nuvifone
2. Hold device so the power button is on top (portrait orientation).
3. Press and hold the power button until the calibration screen appears(about 60 seconds).
4. Release the power button
5. Follow the directions to calibrate the screen
For Nuvi 1xxx Series:
1. Make sure the Device is turned off
2. Press and hold the top left corner of the touchscreen
3. Power the unit on whilst keeping hold of the top left corner
4. Continue holding the top left of the screen, after 30 seconds, a small dot will appear
5. Release the touchscreen and accurately touch the dots in turn as and when they appear
6. Once complete a message will appear, ‘Calibration Complete’, Touch OK
The screen will now be calibrated.
For Oregon series, here are the steps to calibrate the touch screen:
1. Turn the Oregon off and power it back on again, holding the power button down as it initializes.
2. After about 30 seconds you will enter a screen calibration page where you can recalibrate the touch screen.
For Papago R58xx series:
1. Tap "Advance Settings"
2. Scroll down to the "System" tab at the bottom
3. Tap "Calibration"
Last modified on: 10/02/2009
Source: Garmin FAQ
Wednesday, 16 January 2013
Interpretation + illustration on the Garmin Satellite Status Page Contents
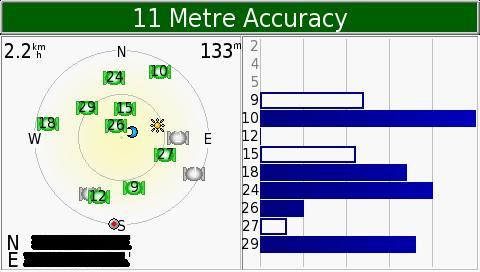
Top green bar of screen shows the current accuracy the Nuvi. It is now reporting an accuracy to within 11M.
- Bars on the right corner of screen is the respective satellite vehicle numbers and their signal strength.
* Hollow bar indicate that your GPS starts to receive data from a respective satellite vehicle.
* Solid bar indicates that the "ephemeris" data can be used to give a "pseudorange" to calculate a position
- The left corner of screen shows the constellation of satellite's that your nuvi is seeing in the sky.
- Solid green icons with numbers are the satellites that the nuvi is locked onto
- Solid gray icons are the satellites that the nuvi can see but can't lock on to
- Flashing icons ( grey/green ) are ones that the nuvi is attempting to lock on to
- Gray / Green cons shown represents the satellite vehicle position in the sky with respect to your present location
- Small round icon with the red center is the direction of your vehicle facing / travelling
- Sun (yellow star burst ) icon is the position of the sun with respect to your present location
- Moon ( blue crescent ) icon is the position of the moon with respect to your present location
- The outer ring represents the horizon, while the inner ring represents an overhead view of the sky at 45 degrees from the vertical
- Numbers in the top left of satellite constellation box is your current speed (0.0 if your stationary)
- Numbers in the top right of satellite constellation box is your current elevation
- Numbers in the bottom left are your current location (Latitude and Longitude)
Source : MyAsean Freemaps
Credits to Author : Silverbeuty
Sunday, 13 January 2013
Installing Papago X5 for Android Tablets n Phones
For newer phones like the Samsung Galaxy S2 and Note the NaviSEA folder must be in the phone main memory. - 20120124
Installing Papago X5 for Android Tablets n Phones.
With the surge in popularity of the Android O/S for portable devices in the GPS application we are certain that the trend will stay. This brief tutorial serve as a guide for those adventurous enough to try their hands on a new navigation platform. The Papago X5 is one of the popular navigation apk for the Android system. Here is how it can be installed.... enjoy.
1. - Down Papago x5 SG/MY from Papago Taiwan Site - All 5 files from Papago Taiwan
- Select My/Sg Installation.
- Download n Install Spare Parts from the Android Market. Spare Parts is an Android system parameters configuration program.
2. Unzip the Papago X5 rar files and you will have
- NaviSEA folder
- PAPAGO_X5SEA_0806_WWEMarket.apk
3. Copy the NaviSEA folder + PAPAGO_X5SEA_0806_WWEMarket.apk to your Android SD card root directory.
4. To match your screen resolution copy the nearest screen resolution (choose smaller than your screen size) of the installation
and paste it back to the same folder. Rename the copied folder to match your screen resolution.
eg.
Your screen resolution = 600x1024
Papago nearest screen resolution = 480X854
Copy and Paste the folder 480X854 into the same folder and rename it 600X1024. Do this for all folders in Organic and its sub-directories as follow:-
- X:\NaviSEA\Organic
- X:\NaviSEA\Organic\CHT
- X:\NaviSEA\Organic\EN
- X:\NaviSEA\Organic\IND
- X:\NaviSEA\Organic\MAL
5. Install the SD card onto your Android unit.
6. Turn On the Android browse and go to SD card Root directory (MyPad).
Please use Papago m8 instead of x5 for your Android as it is now obsoleted. MfM no longer publish x5 maps
For newer phones like the Samsung Galaxy S2 and Note the NaviSEA folder must be in the phone main memory. - 20120124
7. Double click PAPAGO_X5SEA_0806_WWEMarket.apk and choose Android Installer to install Papago X5.
8. Run Spare Parts and Tick/Check Compatibility Mode. This will re-size the display to Full Screen.
9. Power down the Android and Re-Boot. Spare Parts requires a re-boot for Compatibility Mode to take effect. Your unit may require different Spare Part setup. Google it if this doesn't work.
10. Run Papago X5 and select Trail to begin a journey of fun with Papago.
11. The downloaded Program files include the MfM map. Goto our map download section to get the latest Papago map.
12. If you find Papago X5 useful please go to the Android market to purchase it
Please use Papago m8 instead of x5 for your Android as it is now obsoleted. MfM no longer publish x5 maps
For newer phones like the Samsung Galaxy S2 and Note the NaviSEA folder must be in the phone main memory. - 20120124
By:- moeyhc/MfM NPM GG May 12, 2011
edited to add HTC Sensation link by Bro alf - 20110731
edited to add m8 replacement for x5 - 20111118
edited to add statement on newer Android phones installation - 20120124
Note: Update to this procedure will end when the M8/M9 is available.
Source from : My Asean Free Maps
credit to Author : MOEYHC
Sunday, 30 December 2012
Free MFM Papago- New release from My Asean FreeMaps
FREE-MFM-PAPAGO! Maps is for PAPAGO! X8.5, X9,M3GPS X8.5, PAPAGO! Android M9 and M3GPS PAPAGO! ONE navigation software to use this map.
Disclaimer & Warranty
The map is provided on "as-is" basis, MFM provides no warranty & disclaims liability on any consequences, damages and whatsoever arising from its use. DO NOT use the map if you do not agree to this condition!
Please note that there is only one version of FREE MFM-Papago Map for PAPAGO! X8.5~X9
Download Links:
http://www.mediafire.com/?n4cfk7rkmmnvu4y
Map Features
1. Junction views.
2. Lane assists.
3. 3D Buildings (courtesy of Papago).
4. Shaded intersections.
5. Toll booth alert (Selected toll roads).
6. Speed limit sign.
7. Speed camera alert & icon display. *New! - AES Speed Camera Alert Included.
8. Fast POI search.
9. Custom POI icons.
10. Malaysia highway symbol.
11. Announce approaching underpass, flyover, bridge, tunnel, parking area and rest area.
12. Singapore postal code.
13. Coverage of Malaysia, Singapore and Brunei.
Credit to Author MyAsean Freemaps : Sunn
For more discussion feel free to visit MyAseanFreemaps at: http://www.malfreemaps.com/viewtopic.php?f=48&t=13693
Tuesday, 25 December 2012
EastBay RC: Interesting stuff on Turnigy 9XR (updated 12/24)
EastBay RC: Interesting stuff on Turnigy 9XR (updated 12/24): And it's here! Turnigy 9XR Transmitter Mode 2 Turnigy 9XR Transmitter Mode 1 Modules and Receivers: top row: FrSky (non...
Wednesday, 12 December 2012
EastBay RC: Binding Spektrum DSM and Turnigy OrangeRX Receiver...
EastBay RC: Binding Spektrum DSM and Turnigy OrangeRX Receiver...: Here's how to bind a DSM{2,X} transmitter and receiver. This applies to both Spektrum and OrangeRX units. Safety First: Remove your...
New Garmin Maps for Malaysia And Singapore
For Garmin users
A new maps from My Asean Free Maps forum has been release for update dated 26 November 2012
you can download from link above
after download and extract the file. Please run the exe file and follow the wizard to gained the maps
after that transfer the maps to your garmin device or your handphone in the garmin folder
Credit to : http://www.malfreemaps.com
Monday, 10 December 2012
AES Camera Traffic POI for Garmin Mobile XT
Recently My Asean Free Maps forum has released POI for AES Camera Traffic for Nokia Smartphone user for Garmin Mobile XT apps.

Image from Malaysian Insider Website
feel free to download here https://skydrive.live.com/?cid=fb820799eabfcb2d&id=FB820799EABFCB2D%21199
notes
the downloaded application contain other POI such as
01) MFM-Accident Area v2.7
02) MFM-AES Camera v2.2
03) MFM-AES Speed Trap v1.1 (JPJ 14 Spot)
04) MFM-AES Traffic Light v2.1
05) MFM-Checkpoints v3.0
06) MFM-Expressway R&R Stop areas v5.0
07) MFM-Latar_Toll v1.0
08) MFM-Ngvstations
09) MFM-Night Market POIs v2.22
10) MFM-NKVE_Cameras v1.0
11) MFM-Pasar Tani v2.3
12) MFM-Power Grids v2.0
13) MFM-Railway Crossing V2.5
14) MFM-Redlight Cameras v1.9
15) MFM-Road Junctions
16) MFM-School Zone v2.0
17) MFM-SGRC_B_W_091206
18) MFM-SGRC_S_W_091206
19) MFM-Sharp Bend v3.6
20) MFM-Speed Traps & Camera v5.3
21) MFM-State Border V1.0
22) MFM-Toll Plazas v2.1
23) MFM-Tunnel v1.4
24) MFM-Touch n Go Hubs v1.0
just tick "/ " which POI would like to install into your smartphone
and put the file at Garmin POI folder
please take notes
Custom POIs - AES
The created cPOI is just for hobby project only, and is to be shared with others.
The Trigger point is set at 1.5 kmh to 2 kmh. It comes in a WAV format.
The WAV voice has been tested with a Nuvi 1350 and found to be working.
For GMXT, only the beep tone can be heard, no voice audio.
- The cPOI provided is on "as-is" basis.
-No guarantee is implied as to the accuracy or validity of the exact location.
- Waypoints are placed as accurately as possible and are assumed to be facing either way.
Therefore, you will get alerts from both direction.
- Please drive responsibly. Do not misuse this POI for your public road racing exploits.
credit to http://www.malfreemaps.com
Sunday, 9 December 2012
My Personal Review and Experience in Smartphone GPS Software
Okay this is my personal view and experience after using 3 GPS software in my smartphone
The GPS that i am gonna review are
1. Garmin Mobile XT
2. Nokia Maps
3. Papago on Android Smartphone
1. Garmin Mobile XT
Pros
- Nice interface but kind not update
- Maps more mature as many user use garmin mobile XT
- Can get maps by download from Forum
- I had no problem following guide in rural area like in a village
Cons
- Kind of confusing when using in urban area
- Slow connection to GPS satellite
- Lack of detail , as many detail will slow your smartphone
2. Nokia Maps
Pro
- Very nice interface
- Detail information , especially in selecting which lane from guide given , nice 3D iconic monument
- Very useful in urban area's
Cons
-It's hard to search places
- Not suitable for rular area because the map not updated by the locals.
3.Papago
- Same with Nokia Maps but much detail compare to Garmin
- Lane assist like nokia maps
Cons
- it 's hard to understand for selected voice in Malay language
Subscribe to:
Posts (Atom)
Popular Posts
-
 Hello .. This time I would like to make a short review on TMnet Unifi. This article will cover about the installation, list of device, pr...
 -
Finally after several weeks and days reading from RC Groups forum, i finally decided to convert my main motor to brushless one, i know its o...
-
Today i wanna replace my MIG29 profile that had crashed and smashed to ground. I wanna fly different kind of r/c jetplane so i choose a new...
-
For newer phones like the Samsung Galaxy S2 and Note the NaviSEA folder must be in the phone main memory. - 20120124 Installing Papa...
-
 Continue from part 1 To build a blu-baby R/C airplane require many item and electronic such as 1. 2 Sheets foamboard - Can get from loca...
 -
I am a little late to update my blog enty because I was busy preparing for my first quadcopter, I had a little experience when operating a...
-
After sometimes flying 450 size quadcopter i really satisfied with its performance, no jello and working perfect with APM flight controller....
-
 I say after so many experience i had in build multirotor from KK2 , Multiwii and finally APM 2.5, i found it APM 2.5 is a most easy and n...
 -
 Now i already combine two fuselage with the monobloc and glue it with hot glue. After that setting up the elevator and rudder and make sure ...


