
Tuesday, 29 January 2013
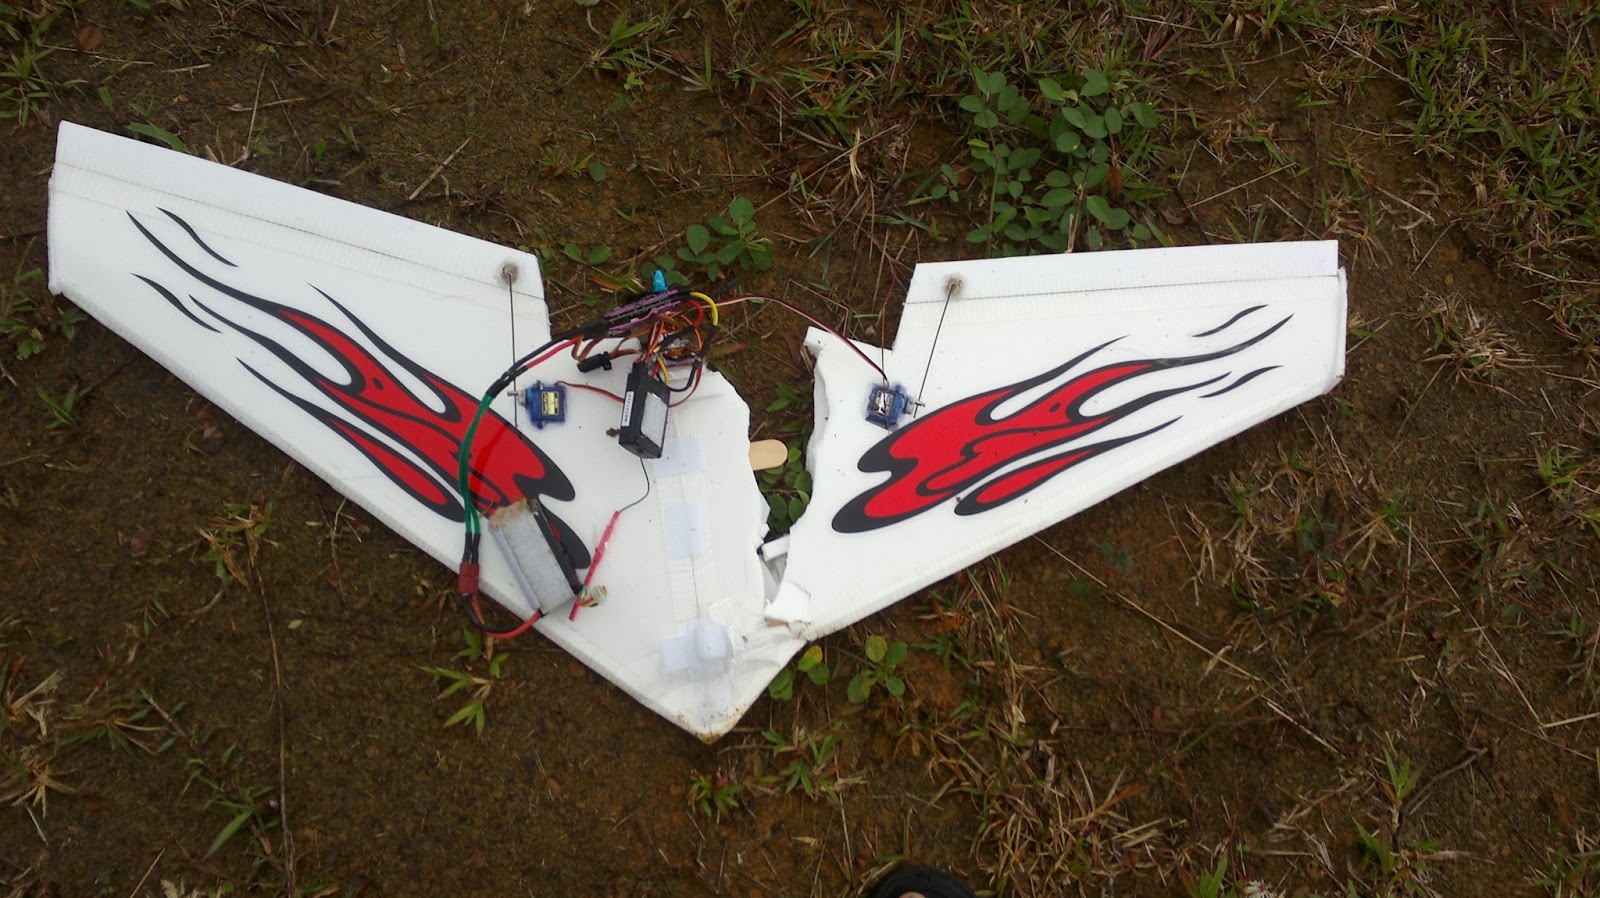
My depron wing failure maiden
Recently i build my first delta wing ..but i failed it ..maybe i am not trow it right..i think my CG is correct..errmmm just another bad luck ..


Thursday, 17 January 2013
Tanjung labuh Sunday Gathering Photo Album dated 14/01/2013 Part Two
Continue from part 1
This is my scratchbuild blu-baby DIY plane in the blue sky..nice ...

i am try to fly the plane against strong wind that day.....

She is so floaty ..like a feather hahahaha
 My SK450 quad with KK2 and DIY Blu-baby

This is my scratchbuild blu-baby DIY plane in the blue sky..nice ...

i am try to fly the plane against strong wind that day.....

She is so floaty ..like a feather hahahaha


Wednesday, 16 January 2013
Interpretation + illustration on the Garmin Satellite Status Page Contents
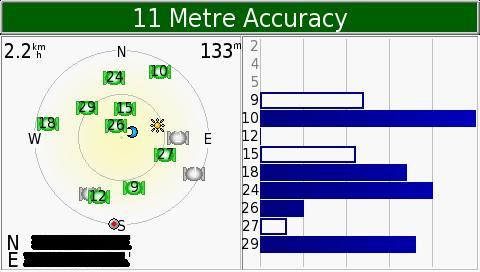
Top green bar of screen shows the current accuracy the Nuvi. It is now reporting an accuracy to within 11M.
- Bars on the right corner of screen is the respective satellite vehicle numbers and their signal strength.
* Hollow bar indicate that your GPS starts to receive data from a respective satellite vehicle.
* Solid bar indicates that the "ephemeris" data can be used to give a "pseudorange" to calculate a position
- The left corner of screen shows the constellation of satellite's that your nuvi is seeing in the sky.
- Solid green icons with numbers are the satellites that the nuvi is locked onto
- Solid gray icons are the satellites that the nuvi can see but can't lock on to
- Flashing icons ( grey/green ) are ones that the nuvi is attempting to lock on to
- Gray / Green cons shown represents the satellite vehicle position in the sky with respect to your present location
- Small round icon with the red center is the direction of your vehicle facing / travelling
- Sun (yellow star burst ) icon is the position of the sun with respect to your present location
- Moon ( blue crescent ) icon is the position of the moon with respect to your present location
- The outer ring represents the horizon, while the inner ring represents an overhead view of the sky at 45 degrees from the vertical
- Numbers in the top left of satellite constellation box is your current speed (0.0 if your stationary)
- Numbers in the top right of satellite constellation box is your current elevation
- Numbers in the bottom left are your current location (Latitude and Longitude)
Source : MyAsean Freemaps
Credits to Author : Silverbeuty
Unifi and HyppTV short review
Hello ..
This time I would like to make a short review on TMnet Unifi. This article will cover about the installation, list of device, pros and cons of the Unifi and HyppTV.
Actually I already use Unifi and Hypptv for one month since now. I am quite satisfied with Hypptv and Unifi but they can improve and beat others competitor if they can overcome from lack of interesting channel like movie channel and user friendly device.
Installation
UniFi installation is time consuming and require lots of device installation compare with installation of streamyx, it took 4 hours to finished, so if you wanna to set a meet up with the techician to install Unifi
make sure yourself or friends was there at home during UniFi installation progress.
Keep in mind if customer is not in home at the date for the Unifi technician comes for the installation, the customer can be fined up to RM 200.
. Ok why to 4 hours u have to wait for the technician done install the Unifi ?
This is because fiber optic cables is been brought from outside into the house .. not like streamyx which only requires the phone line only. and Unifi contractor should inspect the ceiling position to plan cable routing to the location requested by the customer. oh not to forget, customer also have to provide a 4 pin plug as for a full set of device like a modem Router, Fibre Optic Modem, DECT Phone and lastly HypptyTopBox.

Unifi Internet
After installation I tested Unifi internet speed, I use Yes Speed Test on the website http://www.yes.my/v3/speed-test.do ... the results are 4.68 mbps download and 4.32mbps upload ..
quite fast..but I heard a bad news that Unifi speed will be reduce when maximum quota reached 60gigabyte
HyppTV

HyppTV is a IPTV, which it use internet on its own and not share with the internet Unifi,
the top box look cheap, less attractive and less user friendly compared to Astro beyond decoder. HyppTV remote also cannot control TV function like control the volume and standby mode.

The best part of Hypptv is that it can turn your regular high definition tv like a smart tv function, for example a picture inside picture, Youtube and a Facebook application
here is the link for the manual HyppTV top boxhttp://www.tm.com.my/PublishingImages/unifi/pdf/HyppTV%20service%20guide%20_with%20bm_rev9%20on%2010%2001%2011.pdf
Tips: You have to switch on the internet before switch on HyppTV Top box. if not error massage will appear that your topbox not sycronize with server.

HyppTV have three major functions, Live TV, Interactive, VOD:
Live TV
For list of channel. HyppTV offer a 30 premium channel previews for a month, 15 regular channels, 10 radio stations. Among my favorites Channel are Nat Geo Adventure and Discovery Channel BBC HD,
Interactive
There is youtube, Horoscope, weather and some recipes with video instruction how to cook the recipes. Youtube sometimes fast loading with video and sometimes idle with black screen like nothing happen.
VOD
for those who want to subscribe to video feature, but most of the videos already see in astro movie, the pricing is from RM8.00 to RM10, 00 per movie for 48 hours, only free video upin and ipin season 1 and season 6 only, my children love to see
Lastly i hope Unifi can include something like list below to attract more custome
- Movie Channel HBO, Star
- Equipment and a user-friendly remote
- Reduce the price of the package, Unifi mothly RM 149 + 30 = 179 is quite expensive
That's all, Thank u for read my short review about Unifi and Hypptv,
Monday, 14 January 2013
Tanjung labuh Sunday Gathering Photo Album dated 14/01/2013
Enjoy a lil bit Photo Album from Tanjung Labuh Airfield

Thats my friend n mentor Mail and Karz , n Bro Yanto with his Katana ...damm i am so envy
 gasser plane ...
 Bro Karz now setup Mail Techone Venus ..although is the condition is strong wind


Thats my friend n mentor Mail and Karz , n Bro Yanto with his Katana ...damm i am so envy


Ready for takeoff
My SK450 quadcopter flying video
Thanks to fellow malaysia-rc members i finally manage to fly it , even so with autolevel mode
just wanna share my quad copter flight video , yes i know the danger ..but i already yelled my brother that capture the video to keep distance
i am just curios how bad my quad vibrate ..so i just selotape my nokia C6-01 and pretend it was a go pro HD Cam hahaha...cross my finger if my hp is drop dead from above..yet crash due wrong CG ..lucky me it drop to big bush....yes it vibrate so much ..i will balancing prop and reduce vibrate once i get proper camera
warning, ...might be dizzy due wrong CG ..the quad spinning itself
just wanna share my quad copter flight video , yes i know the danger ..but i already yelled my brother that capture the video to keep distance
i am just curios how bad my quad vibrate ..so i just selotape my nokia C6-01 and pretend it was a go pro HD Cam hahaha...cross my finger if my hp is drop dead from above..yet crash due wrong CG ..lucky me it drop to big bush....yes it vibrate so much ..i will balancing prop and reduce vibrate once i get proper camera
warning, ...might be dizzy due wrong CG ..the quad spinning itself
Sunday, 13 January 2013
Installing Papago X5 for Android Tablets n Phones
For newer phones like the Samsung Galaxy S2 and Note the NaviSEA folder must be in the phone main memory. - 20120124
Installing Papago X5 for Android Tablets n Phones.
With the surge in popularity of the Android O/S for portable devices in the GPS application we are certain that the trend will stay. This brief tutorial serve as a guide for those adventurous enough to try their hands on a new navigation platform. The Papago X5 is one of the popular navigation apk for the Android system. Here is how it can be installed.... enjoy.
1. - Down Papago x5 SG/MY from Papago Taiwan Site - All 5 files from Papago Taiwan
- Select My/Sg Installation.
- Download n Install Spare Parts from the Android Market. Spare Parts is an Android system parameters configuration program.
2. Unzip the Papago X5 rar files and you will have
- NaviSEA folder
- PAPAGO_X5SEA_0806_WWEMarket.apk
3. Copy the NaviSEA folder + PAPAGO_X5SEA_0806_WWEMarket.apk to your Android SD card root directory.
4. To match your screen resolution copy the nearest screen resolution (choose smaller than your screen size) of the installation
and paste it back to the same folder. Rename the copied folder to match your screen resolution.
eg.
Your screen resolution = 600x1024
Papago nearest screen resolution = 480X854
Copy and Paste the folder 480X854 into the same folder and rename it 600X1024. Do this for all folders in Organic and its sub-directories as follow:-
- X:\NaviSEA\Organic
- X:\NaviSEA\Organic\CHT
- X:\NaviSEA\Organic\EN
- X:\NaviSEA\Organic\IND
- X:\NaviSEA\Organic\MAL
5. Install the SD card onto your Android unit.
6. Turn On the Android browse and go to SD card Root directory (MyPad).
Please use Papago m8 instead of x5 for your Android as it is now obsoleted. MfM no longer publish x5 maps
For newer phones like the Samsung Galaxy S2 and Note the NaviSEA folder must be in the phone main memory. - 20120124
7. Double click PAPAGO_X5SEA_0806_WWEMarket.apk and choose Android Installer to install Papago X5.
8. Run Spare Parts and Tick/Check Compatibility Mode. This will re-size the display to Full Screen.
9. Power down the Android and Re-Boot. Spare Parts requires a re-boot for Compatibility Mode to take effect. Your unit may require different Spare Part setup. Google it if this doesn't work.
10. Run Papago X5 and select Trail to begin a journey of fun with Papago.
11. The downloaded Program files include the MfM map. Goto our map download section to get the latest Papago map.
12. If you find Papago X5 useful please go to the Android market to purchase it
Please use Papago m8 instead of x5 for your Android as it is now obsoleted. MfM no longer publish x5 maps
For newer phones like the Samsung Galaxy S2 and Note the NaviSEA folder must be in the phone main memory. - 20120124
By:- moeyhc/MfM NPM GG May 12, 2011
edited to add HTC Sensation link by Bro alf - 20110731
edited to add m8 replacement for x5 - 20111118
edited to add statement on newer Android phones installation - 20120124
Note: Update to this procedure will end when the M8/M9 is available.
Installing Papago X5 for Android Tablets n Phones.
With the surge in popularity of the Android O/S for portable devices in the GPS application we are certain that the trend will stay. This brief tutorial serve as a guide for those adventurous enough to try their hands on a new navigation platform. The Papago X5 is one of the popular navigation apk for the Android system. Here is how it can be installed.... enjoy.
1. - Down Papago x5 SG/MY from Papago Taiwan Site - All 5 files from Papago Taiwan
- Select My/Sg Installation.
- Download n Install Spare Parts from the Android Market. Spare Parts is an Android system parameters configuration program.
2. Unzip the Papago X5 rar files and you will have
- NaviSEA folder
- PAPAGO_X5SEA_0806_WWEMarket.apk
3. Copy the NaviSEA folder + PAPAGO_X5SEA_0806_WWEMarket.apk to your Android SD card root directory.
4. To match your screen resolution copy the nearest screen resolution (choose smaller than your screen size) of the installation
and paste it back to the same folder. Rename the copied folder to match your screen resolution.
eg.
Your screen resolution = 600x1024
Papago nearest screen resolution = 480X854
Copy and Paste the folder 480X854 into the same folder and rename it 600X1024. Do this for all folders in Organic and its sub-directories as follow:-
- X:\NaviSEA\Organic
- X:\NaviSEA\Organic\CHT
- X:\NaviSEA\Organic\EN
- X:\NaviSEA\Organic\IND
- X:\NaviSEA\Organic\MAL
5. Install the SD card onto your Android unit.
6. Turn On the Android browse and go to SD card Root directory (MyPad).
Please use Papago m8 instead of x5 for your Android as it is now obsoleted. MfM no longer publish x5 maps
For newer phones like the Samsung Galaxy S2 and Note the NaviSEA folder must be in the phone main memory. - 20120124
7. Double click PAPAGO_X5SEA_0806_WWEMarket.apk and choose Android Installer to install Papago X5.
8. Run Spare Parts and Tick/Check Compatibility Mode. This will re-size the display to Full Screen.
9. Power down the Android and Re-Boot. Spare Parts requires a re-boot for Compatibility Mode to take effect. Your unit may require different Spare Part setup. Google it if this doesn't work.
10. Run Papago X5 and select Trail to begin a journey of fun with Papago.
11. The downloaded Program files include the MfM map. Goto our map download section to get the latest Papago map.
12. If you find Papago X5 useful please go to the Android market to purchase it
Please use Papago m8 instead of x5 for your Android as it is now obsoleted. MfM no longer publish x5 maps
For newer phones like the Samsung Galaxy S2 and Note the NaviSEA folder must be in the phone main memory. - 20120124
By:- moeyhc/MfM NPM GG May 12, 2011
edited to add HTC Sensation link by Bro alf - 20110731
edited to add m8 replacement for x5 - 20111118
edited to add statement on newer Android phones installation - 20120124
Note: Update to this procedure will end when the M8/M9 is available.
Source from : My Asean Free Maps
credit to Author : MOEYHC
Subscribe to:
Posts (Atom)

Popular Posts
-
 Hello .. This time I would like to make a short review on TMnet Unifi. This article will cover about the installation, list of device, pr...
 -
Finally after several weeks and days reading from RC Groups forum, i finally decided to convert my main motor to brushless one, i know its o...
-
Today i wanna replace my MIG29 profile that had crashed and smashed to ground. I wanna fly different kind of r/c jetplane so i choose a new...
-
For newer phones like the Samsung Galaxy S2 and Note the NaviSEA folder must be in the phone main memory. - 20120124 Installing Papa...
-
 Continue from part 1 To build a blu-baby R/C airplane require many item and electronic such as 1. 2 Sheets foamboard - Can get from loca...
 -
I am a little late to update my blog enty because I was busy preparing for my first quadcopter, I had a little experience when operating a...
-
After sometimes flying 450 size quadcopter i really satisfied with its performance, no jello and working perfect with APM flight controller....
-
 Now i already combine two fuselage with the monobloc and glue it with hot glue. After that setting up the elevator and rudder and make sure ...
 -
 I say after so many experience i had in build multirotor from KK2 , Multiwii and finally APM 2.5, i found it APM 2.5 is a most easy and n...


