Monday, 17 November 2014

DIY Mini Speedster Depron Plane from Flitetest

mini speedster, depron, fpv
Above is my new mini speedster plane that i build from depron, it use only 2 cell battery and have nice flying characteristic, very floaty and easy to build

Project Status : Success
Project Time-frame: Mid November 2014
     
mini speedster


          Picture from flite test website

 The other three motor has being used as a mini DIY tricopter, for the maiden flight it was a successul and fly nice ..


Video:
below is my maiden flight video with attached mobius cam with my hat
Picture :

I added few changes like a landing gear, fuselage cover and a LEGO action figure toy to added scale look
here are the photo below


maybe when budget permits i will added mini FPV setup for a pilot's view


http://www.thingiverse.com/thing:327338#sthash.zTzt6Zho.dpuf
Project Summary

This is first plane i ever made from flite test plans, it only use 1/2 depron to build one and the instruction to build is very easy and if you lost, just follow the guide video from Josh from youtube.

from the video you can see the motor seems lack of thrust, i cannot able to make a loop with this motor, soon i will upgrade to a better motor

Spec
one only ZMR@RCX motor 1804 from Myrcmart
-Afro ESC 12 amp simonk
-Turnigy 9xr and 800mah 2 cell
- 5x3 props

when the budget permits i will upgrade it with smallest camera and fpv equipment, i dream to fly it

Project Budget
RM 30.00 and a old mini quad

Parts for the Project

1. ZMR Motor -


http://www.banggood.com/ZMR-1804-2400KV-Micro-Size-Integration-Outrunner-Brushless-Motor-p-923424.html?p=6Q272106433620120652


Source from:
 http://www.flitetest.com/articles/ft-mini-speedster-build

Sunday, 16 November 2014

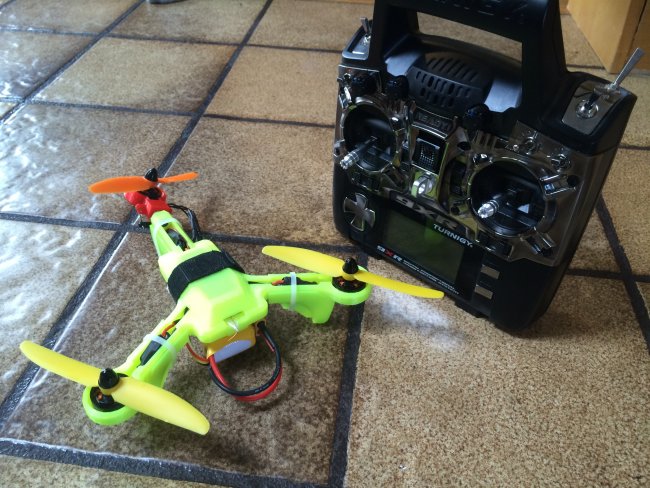
DIY 3D Printed Tricopter with Acro Naze32

Project Summary: To make a fun mini tricopter that can fly indoor and outdoor
Project Status : Success
Project Time-frame: Mid November 2014


Pic above from flite test :http://www.flitetest.com/articles/mini-tricptr-3d-printed-tricopter

Video:
below is my maiden flight video with attached mobius cam with my hat


http://www.thingiverse.com/thing:327338#sthash.zTzt6Zho.dpuf
Project Summary

one of the motor from my previous miniquad is being use as powerpod for flitetest mini speedster plane,
The remaining 3 motor is used for my 3d printed tricopter...
This is my first tricopter build and it is also my first maiden of my tricopter

Spec
-3 ZMR@RCX motor 1804 from Myrcmart
-Afro ESC 12 amp simonk
-Acro Naze32
-1300 mah 3cell with 5x3 props

 The most crucial parts of tricopter is how to build a tilt mechanism, it must had a good servo speed and agility .
For maiden flight the first problem that i facing is the quad start spinning one direction only.
the problem is solved after i reverse the servo setting at a Baseflight configurator.

The mini tricopter is fly so fast and agile..but it is a small size and hard to find the orientation once the tricopter flew away. so for my next project is to put FPV equipment for long range flight with this mini

Project Budget
RM 30.00 and a old mini quad

Source from:
http://www.flitetest.com/articles/mini-tricptr-3d-printed-tricopter
http://www.thingiverse.com/thing:327338#sthash.zTzt6Zho.dpuf
http://www.thingiverse.com/thing:327338

Sunday, 13 April 2014

DIY Mini quad with Acro Naze32 FC

After sometimes flying 450 size quadcopter i really satisfied with its performance, no jello and working perfect with APM flight controller.

I am realizing 450 size its heavy and quite bulky, its put much space with sharp and large prop,

I need a quadcopter that same performance like 450 but light and portable.,,,,,

yess the answer is mini quadcopter 250 size..

seems to me that if quadcopter with smaller size the price of component is lower ..wrong man, the price still same for frame and motor, a Blackout carbon fiber frame price is nearly one DIY 450 quad price

i bump to a blog named http://untestedprototype.com/ . Its about how to build a mini quadcopter with plans included. i called my friend who had CNC machine to build it.


My friend make it with including damper for eliminating vibration and jello free. the material is from G10, quite rigit but heavy abit compare to carbon fibre frame, the weight frame only is about 180gram

For power setup, i get a quite nice review from my friend that using ZMR/RDX 2400kv motor and 10amp Simonk ESC from Myrcmart..so i brought it for RM 279 complete 4 motor and 4 esc

Now for Flight controlled, i choose Acro Naze32 because it had a good review and same performance like openpilot CC4, when the FC arrived ..i could not believe its so small and light but powerful,
to use Acro Naze32 and configurate it is not so hassle because it only had autolevel function. The program i used is Baseflight configurator that u can find it at google crome apps.


For props i just use cheap gemfan 5x3, its price half the price standard 10x4 multirotor prop

My maiden flight is smooth although my 1000mah battery shows it has no punch, i need to get a new battery

My FPV experience with mini quadcopter is quite surprising , it so much nice to control and handle .
.here my video show for my first time fpv with mini's

Wednesday, 19 February 2014

How to build an Multirotor with APM Arduflyer Flight Controller part Two

continue from part 1...

After assembly all the parts, now join the motor to quadcopter arm using screw that provided with
, make sure u put a little bit treadlock oil for grip, not to much, believe me its so hard to unscrew it

finally all four motor now inserted to each arm, next is to put esc


Tuesday, 18 February 2014

How to build an Multirotor with APM Arduflyer Flight Controller part One

After so many times ups and down with my quadcopter, now is time to upgrade my motor.  The reason i wanna upgrade is that my left side motor seems has lost its c-clip and it cause the motor not to spin smoothly or maybe the bearing is broken... so i decided to build again my quad copter from scratch and share to fellow readers how to build an Multirotor and to Setup APM arducopter with Mission Planner

First of all to start build it, we have to list out the component need to make a functional quadcopter

here the picture and a parts need to build it, some of the parts are  from my old quad copter, feel free to change with your preferred setup, this setup is just for guidelines only

  Here my quad setup specification

a. 4 unit sunnysky 980kv motor
    - this is good motor and balance well from what i heard from internet, still in the box not tested yet

 or u can use this motor like Turnigy Multistar
 http://www.hobbyking.com/hobbyking/store/uh_viewitem.asp?idproduct=49866&aff=447355


b. 4 esc Hobbyking 20a with Simonk Firmware

click link down below for info

c. a power distribution board

click link down below for info 
 d. For flight controller i use APM 2.52 or at Hobbyking as a HK Pilot Mega V2.5 

for info and price click link below
e. still the board doesn't quite completed with GPS for function like loiter and Return To Home
http://www.hobbyking.com/hobbyking/store/uh_viewitem.asp?idproduct=49725&aff=447355

additional parts like

g. prop CW and CCW (clockwise and Counter Clock Wise) 10x4.5 size
h. 3.5mm gold connector for esc
i. some doublesided tape, hex screw


Wednesday, 5 February 2014

Turnigy basic FPV googles review

Tunigy basic FPV google  is an inexpensive and easy to use for anyone who wanna try FPV but lacked budget.  I received one unit of used google  through online purchase at Malaysia RC forums with cheap price and it has been modified and inserted with ski google to block light and to feels total darkness. 

The unit I received included  with pouch , cleaning cloth and 2 earphones ,The google  has a connection to the casing that has switch device on / off and contained batteries with it , it is also a place to connect a 3.5 audio jack to hear sound .the google had a long wire with RCA plug to connect any device that support it 

I test the connection from my googles to Astro Setelite box to see the picture and screen quality, The images was clear and u can see tv lines in it, what can i say it only has 320 resolution 


..it feels like viewing a regular 32inch TV  in a dark room with a distance 2 meter..although the resolution is low, the colour and virtual screen size is small, its still usable for FPV flying 


To use it for FPV flying u still need others device like Video Transmitter, Video Receiver and decent camera with wide lenses ..here the list of it to starting an a basic FPV equipment


boscam TX and RX


click Hobbyking link for info
http://www.hobbyking.com/hobbyking/store/uh_viewitem.asp?idproduct=15295&aff=447355

and for camera 

http://www.hobbyking.com/hobbyking/store/uh_viewitem.asp?idproduct=16461&aff=447355


and i put my FPV equipment at my MJX F45 helicopter. i was my first time FPV flying...its quite funny and a whole new experience, i had an difficulty to navigate because my camera lenses is not wide enough to see the surrounding

 
 My first FPV helicopter....its a thrill


another lack of this google..it has long wire and sometime i get tangle with it, so to setup FPV it consumes time...i recently mod it like this


                                                     the fan is nothing to do with google ...


anyway still it is best google around for new comers ...but the google is hard to find at hobbyking now


Pro -
1.Cheap 
2.Easy to Use
3.long battery usege
 
Cons  

Low Resolution  
Sense of bulky especially wire from google
Small FOV

Wednesday, 8 January 2014

Tasco 2023BRZ Essentials Binocular 10x50mm from Lazada

I quickly grab this tasco binocular after i found it was less RM100,00 at Lazada. before that Lazada sell this binocular for price RM 250.00 same as Celestron Upclose 10x50 , now after i checked again the price is reduced to RM145.00...better buy it before lazada changing price hehehe

But the downside is, i think Lazada dont have the items at the warehouse, maybe dropship the product from china or somewhere else. because this is not my first time dealing with Lazada, they always send item next day after order is comfirm, my powerbank i order after binos is receive first ..but now i receive my item binos 2 weeks after order..c'mon lazada, and for COD lazada dont use TAQBIN instead they use own dispatch curier that lack of communication with lazada central.

.what a pity The item is receive with well packaging, comes with bags, slings, lens cover, manuals and a cloth, the bodys is well covered with rubber, feels light and firms.

In daylight the binos perform well with nice view, bright and crips image, i test view at Stulang beach near Johor Bahru, and fascinate by the bino views ....i can see clearly view of Apache helicopter performing routine fly at Singapore .. ...

In nightime the binos is good for viewing stars, moon and planets, i can see 4 moons on jupiter and a orion nebula in city lights

Here is my unboxing video and test view
Related Posts Plugin for WordPress, Blogger...

Popular Posts